Snowflake Headband

Brrrrrrr. It is mighty cold here today. I sent DH back to work finally and all I accomplished while he was home on vacation was this measly snowflake headband.


I had to make a fire in the woodstove first thing this morning and I'm going to have to keep it stoked all day. Peaches doesn't look very happy at the thought of inspecting firewood all day instead of her usual daily routine of napping in the sunshine.


I'm no meteorologist but it looks like snow is on the way. You can't even see the mountains. That is a pile of pinon DH is working on splitting on the left.

Checkered Socks


I finished a pair of socks finally. I started with the checkered socks from Socks, Socks, Socks and then took off and did my own thing. The colors are better in real life but today we actually have some sun here in NM which is fading the colors. I can never seem to get turquoise right in a photograph or a scan. Anyway, I used worsted weight yarn from my stash (Cascade 220 and Peruvian Highland wool), size 4 dpns, and 48 stitches.

Mystery Cast On


Does anyone out there know what this mystery cast on is called? Initially I thought it was the Guernsey cast on but the instructions seem different in Vogue Knitting. I traded away my Montse Stanley book which has the most cast ons but I may have to break down and buy it again.

In "Gloves from Handspun: Totally Tubular" in the Winter 1996 issue of Spin-Off Jude Daurelle says the reason some knitters get holes between the fingers of their gloves is because the backwards loop cast on is normally used to cast on stitches in the middle of the row. She suggests the cast on shown above instead.

Here are the directions: 1. Holding the yarn in back of the work, insert the left hand needle into the front of the last stitch on the right hand needle (directly down the loop). Yarn over right hand needle and draw up a new loop, but do not lift the old loop off the left hand needle. 2. Bring the point of the right hand needle down in front of the left hand needle and enter the loop (still on the left hand needle) from underneath, to the rear. Yarn over the right needle and pull a new stitch from rear to front while pulling down through the left loop. Pull the yarn slightly to tighten the tension. One new stitch is now cast on.

Any ideas???
My apologies for not having any knitting FOs this week. I am hard at work on the technique section of the glove booklet. I currently have 12 pages in small print and I know I haven't explained as much as I want to about glove knitting. Still, I need to get this finished by tomorrow and move forward to coming up with some glove patterns.

Besides the embroidered jacket I have also started a sock in worsted weight yarn. I am using the checkerboard sock pattern in Socks, Socks, Socks but of course I had to add more colors.


DH has next week off. We're expecting a snow storm but we hope to get a chance to travel to Gallup to buy some Indian jewelry. Maybe my jacket will be finished in time to wear for this fun event.

Embroidered Jacket


Kristin Nicholas the knitwear designer has a terrific blog and a few days ago she had some photos of denim jackets embellished with lots of chain stitched embroidery. I have this denim jacket I bought on sale that I never really loved so this was a perfect time to get some embroidery floss and go to town.


The jacket already had some machine embroidery on the hem and the sleeve cuffs and it was really easy to just add more. I spent about 5 dollars total on the embroidery floss.


It really is pretty minimal from far away but I had such fun doing it I'm going to embroider the button band, pockets, and collar next.
The Teaching Company is offering a free lecture HERE on Martin Luther King, Jr.

Another glove bites the dust. Despite the fact that DH chose this pattern and the yarn colors, he now says he doesn't like the gloves. I think it is the fit - only the sore thumb gusset feels good on his hand. The pattern was pretty busy as well so it is no great loss.


That is me modeling the glove in the photo. To help make the fingers fit on cuff-to-tip gloves I try them on and start the finger decreases when I am 1/2" from the tip of my finger (or about halfway up the fingernail. In this particular glove I had to make the ring finger longer because DH's ring finger is longer than his index finger.


In top-down gloves I also try on the fingers to get the right length. The bottoms are curling in the photo but I stop knitting when the bottom of the knitted finger reaches the webbing between my fingers. In my case where all my fingers start at a different row, I knit until the bottom of the knitted finger reaches the lowest point between the fingers.


We're having a cold spell. Fortunately we have an official firewood inspector who makes sure each piece of wood entering the house meets her exacting specifications.
A few weeks ago I was at Santa Fe's upscale pet store and I saw the cutest pet bed of all time. It was a furry pink Cadillac complete with fins and rear view mirrors and license plates that said spoiled. DH found me standing in the store in a daze near the bed, grinning and imagining Peaches or Jack asleep at the wheel.

I found a photo of this bed online HERE - if you go HERE you can also find photos of "Furraris", "Furrcedes", limos, and even a NYC taxi pet bed.

The chances of me ever forking over that much money for a pet bed are slimmer than the chances of me being asked to be a principal dancer for the Joffrey ballet. Still, it got me thinking about pet beds. I decided I needed to find a fun pattern that I can sew and I found this fish bed that would be perfect for Jack. It looks like it would be too small for Peaches but maybe I can adapt the house for her. The tent is also cute but I'm 100% positive Peaches would chew the poles made from basket weaving materials. I usually do most of my sewing in summer so I have plenty of time to find fun fabrics for the beds.


Norwegian Hat

Don't faint but I'm not even going to mention the "g" word today.


Pattern: Norwegian Hat, Charlene Schurch's Hat's On
Yarn: Nature Spun and Wool of the Andes worsted weight
Needles: Size 4 circs for the inside of the hem and size 6 for the rest
Size: Medium

Not the best photo (colors are different and you can't even see the lice pattern on the top) but the African violet looks good at least.


Here is actual proof I was actually knitting top down, two-needle, double knit, two-color gloves. And because that obviously is not enough - why yes the fingers are knit inside out in this pattern. Why not just hang me up by my toenails and pull all the hair out of my head???


No really it isn't that bad. You get into a nice rhythm with double knitting just like with non-tubular patterns involving slipping stitches but as far as I can tell the fingertips on this glove pattern (Tip-to-Cuff Two Needle Gloves by Beverly Royce in Homespun Handknit) aren't tapered at all. The fingers look normal enough from the front or back as seen above but from the side they look like this:


I thought maybe you did something to fix that when you finished knitting the finger but it doesn't say anything in the pattern.This lack of tapering looks really dorky . I'm not really interested in trying to figure out how to add fingertip decreases to top down double knit two needle stranded color gloves knitted inside out so I'm stopping this latest glove experiment.

As proof that all this focus on gloves is driving me insane, here is my latest Knitpicks order. Normally when I purchase yarn I have some projects in mind but for the life of me I can't remember what I planned to do with these shades of Palette and Merino Style . I'm particularly mystified about what I planned to do with four shades of orange Palette.


I also got two of the new Knitpicks 16" circulars to work on Joyce William's top down gloves from Latvian Dreams. I really like the needles so far - the cables are very flexible and the points are nice.

Knitting Top Down Gloves, Part Two


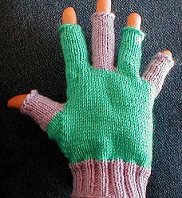
Once the pre-knit thumb is added to the knitting (about 2 inches from the base of the little finger), I did decreases to each edge of the original thumb stitches - SSK on the right side and K2TOG on the left - to form the thumb gusset.


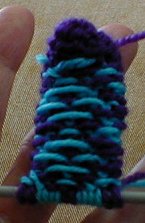
This shows the kitchener stitch used to attach the stitches between each finger. This is one of those moments when you will be really glad to have shorter (5" or less) dpns.


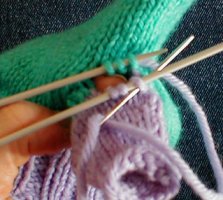
To omit the holes that were formed on each side of the kitchener stitched finger interiors, I flipped the glove and then threaded a needle with yarn. (I used a contrasting yarn for the photo but of course would use matching yarn for the actual glove.) I used the tapestry needle to go around the hole and grab all the backs of stitches that are perpendicular to the yarns moving around the hole. (I'll get a better photo for the booklet.) Pull tight and the hole will disappear.


For this glove I used an excellent reference article called "Knitting Gloves from the Top Down" by Dorothy T. Ratigan in the Fall 1996 issue of Interweave Knits. She includes some good advice on how to measure your hands.

Meg Swansen has a pattern for top-down gloves using I-cord for the fingers in the book Handknitting with Meg Swansen - there is also a video with this pattern at Schoolhouse Press (scroll down).

Joyce Williams has a top down glove pattern in her beautiful book Latvian Dreams. Her method apparently includes an unusual technique where no extra stitches are picked up between the glove fingers and is great for knitters who hate dealing with holes between the fingers. Has anyone used this method? I'm curious how limited the finger movement is on these gloves.

Anna Zilboorg's Magnificent Mittens are all knit top-down and she includes a pattern for mittens with a separate index finger. Interestingly she admits they are fussier to make than she enjoys but "glove knitters, however, should find them no trouble".

One of the most fascinating glove patterns of all time is Beverly Royce's Tip-to-Cuff Two Needle Gloves in Homespun Handknit. These gloves are knit tubular top-down on two needles using double knitting. Not only that, they are done in a stranded color knitting pattern! I plan to knit these gloves next.

Finally, Nonaknits has a great free online pattern (scroll down) for top down gloves using I-cord fingers and the Joyce Williams in between the fingers method.
KNITTING TOP-DOWN GLOVES, PART 1

I knit a simple fingertip-less glove top down using two colors for this tutorial. First I knit each finger. In this glove I experimented with increases at several points for each finger but discovered it really doesn't make a huge difference in fit except for the thumb.

I left the index finger on the dpns but the other fingers have live stitches on orange waste yarn. Using two different colors for the fingers helped me remember each finger; otherwise I would have marked them. If I had knitted fingertips, I would have used my favorite Figure 8 Cast On (scroll down HERE for a tutorial) for each finger.


I transferred the live stitches to dpns for the index, middle and ring finger. Not all the live stitches ended up on the dpns - there are 3 stitches on each side between the index and middle finger and between the middle finger and ring finger. These are held on the orange waste yarn and are to be kitchenered together later.


I knit around several rows before adding the little finger because my hands have a 1/2" jump from the base of my little finger to the base of my ring finger. Again there are three stitches in orange waste yarn on each side of the join between the ring finger and the little finger.


The little finger has been added and next I knit 2 inches more to get to the thumb.


Tomorrow - top-down thumb gussets and how to deal with holes between the fingers.


Ms. Peaches has won the "Best Blog Pet" award over at JenLa.

Here she is receiving her award. Peaches would like to thank the academy and to let everyone know how much this means to her after her year of extreme hardship and suffering (i.e., the dreaded bunny diet). I hope this makes up for my "rodent-like" comment of the other day.

Tomorrow I'll have photos of the process of knitting a glove from the top down. I think then I am finally done talking about gloves here. Is it possible??

Cigar Gloves


I plan to knit some gloves using alternative methods in my research for the glove booklet. So far I've knit one glove using two circular needles. I used the Cigar Glove pattern from Knitty (I knitted all the fingers instead of leaving three open) and used Knitpicks' Wool of the Andes to make a quick glove for DH. He wants the second one to match but I ran out of blue yarn and now he'll have to wait until I finish the glove booklet (probably around the end of February).

You can easily convert any glove knitting pattern that calls for double-pointed needles to two circular needles. You simply put half the stitches called for in the cuff, hand, or fingers on one circular needle and half on the second. Always remember to use two ends of the same circular needle to knit using this method. HERE's a good technique post that demonstrates this method. Heck you can even use one long circular needle and the magic loop method to knit glove fingers - find out how HERE. When you get to the top shaping for the fingertips it is easier to just keep all the stitches on the needle edges rather than putting the resting stitches on the circular not in use on the circular needle's cable.


Honestly I'm not sure if the dpn or 2 circ method is quicker or less fiddly for glove fingers. It really is a matter of your personal preference.

I highly recommend the Cigar Glove pattern to new glove knitters - it is simple and fast because you use worsted weight yarn. I knit this glove in a day while simultaneously surfing the net. I'm not a fan of thicker gloves for myself but DH is fond of them. As you can see from the above photo the pattern as written has quite a jump, about 1/2", between the base of the little finger and the base of the ring finger.