Showing posts with label Basic Knitting Instructions. Show all posts

How to Gauge Knitting Tension

We have stressed the importance of knitting a tension swatch before starting work.

Here is how to proceed:
If the tension quoted is, for example, “22 stitches and 30 rows = 10 cms square measured over stocking stitch on 4 mm needles”, you have to produce a fabric made up of that number of stitches and rows regardless of the needle size you use. The needle size indicated on the pattern is the one most knitters will use to achieve this tension, but it is the tension that is important, not the needle size.

The instructions given in the tension paragraph of a knitting pattern are either for working in stocking stitch or pattern stitch. If they are given in pattern stitch, you must work a multiple of stitches the same as the multiple required in the pattern. If the instructions are given in stocking stitch, any number can be cast on but whichever method is used, it should always be enough to give at least two extra stitches each side, as the edges of a knitting sample will curl and not give an accurate measurement.

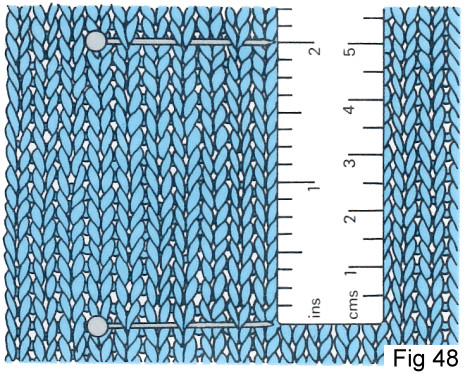
Work in pattern or stocking stitch, casting on the number of stitches given in the tension paragraph, plus 4 (i.e. 26 stitches) and work 34 rows or 4 rows more than the number stated. Break the yarn about 15 cms from the work, thread this end through the stitches, and then remove the knitting needle. Place a pin vertically into the fabric 2 stitches from one side edge. Measure 10 cms exactly and insert a second pin (Fig.47 - Note: diagram shows only 5 cms). Count the stitches. On stocking stitch, each loop represents one stitch. If the number of stitches between the pins is less than that specified in the pattern (even by half a stitch), your garment will be too large. Change to smaller needles and knit another tension sample. If your sample has more stitches over 10 cms, the garment will be too small. Change to larger needles. Check the number of rows knitted against the given tension also (Fig.48). Tension samples should never be measured on the needles because the needle distorts the fabric.


Source: http://www.learn2knit.co.uk/knitting/increasing.php

Knitting Tips : How to Gauge Knitting Stitches 

Provisional Cast-On Tutorial

A provisional cast-on keeps cast-on stitches "live" so that they can be knit later. It's a very useful technique when you're not sure what kind of edging you'll want or how long to make something. With a provisional cast-on, you can make these decisions at the end of a project, allowing you to respond to the actual garment.

There are a few ways to make a provisional cast-on. This is my favorite...

With some smooth waste yarn and a crochet hook, chain a few more stitches than you will be casting on. Cut the tail and pull it through the last stitch.

Examining the chain, the front side is made up of V's.

v's.jpg
The back of the chain has bumps in it. 
bumps.jpg
  • Insert a knitting needle into each bump on the back of the chain, and pick up however many stitches you're casting on.

insert.jpgpickup2.jpg
Then just knit!
  • When you're ready to use the cast on stitches, thread a knitting needle through the right side of each stitch. It's like weaving - over a strand, under a strand...

weavingneedle.jpg
  •  Then remove the crocheted chain by untying the end and gently unraveling the whole chain.

pullingoutchain.jpg
You're ready to knit in the other direction!
source: http://www.purlbee.com :X

Knitting Daily TV: Provisional Cast-ons

Learn How To Knit Entrelac with Video at YouTuBe.Com

I hope that it will help you to understand better

Learn how to knit entrelac bottom triangles with Part One of Planet Purl's six-part how-to video.
Learn how to knit entrelac left edge triangles with Part Two of Planet Purl's six-part how-to video.
Learn how to knit entrelac WS rectangles with Part Three of Planet Purl's six-part how-to video.
Learn how to knit entrelac right edge triangles with Part Four of Planet Purl's six-part how-to video.
Learn how to knit entrelac RS rectangles with Part Five of Planet Purl's six-part how-to video.
Learn how to knit entrelac top triangles with Part Six of Planet Purl's six-part how-to video.

Easy Knitting Instructions to Help you Learn to Knit

Find a comfortable chair in good light. Read through the steps before you start. As with any new skill, learning to knit requires equal measures of patience and perseverance.

This free ebook is sure to be a valued resource. I've just had a look at that website and I think it's useful to beginner. You can watch online at: http://lionbrand.com or click here to download. 

The content of the ebook to help you learn to knit. It consists of 36 topic:

1. Casting On
2. The Knit Stitch (Garter Stitch)
3. The Purl Stitch
4. Ribbing
5. Stockinette Stitch
6. Binding Off(casting off)
7. Making a Gauge Swatch
8. Joining New Yarn
9. Recovering a dropped stitch
10. Unraveling Stitch by Stitch
11. Avoiding Extra Stitches
12. Increasing
13. Increasing - Making a Simple Increase (knitting into the front and back of a stitch)
14. Increasing Between a Stitch ('Make One')
15. Increasing - The Yarn Over Increase
16. Decreasing
17. Decreasing - Slip, Slip, Knit (SSK/SSP)
18. Decreasing - Knit/Purl Two Together (K2tog / P2tog)
19. Slipping Stitches Purlwise and Knitwise
20. Making a cable
21. Knitting into the Back Loop/Front Loop
22. Purling into the Back Loop/Front Loop
23. Finishing / Sewing pieces together
24. Weaving in Ends
25. Three needle bindoff
26. Picking up Stitches
27. Knitting with two strands together
28. Duplicate Stitch
29. Grafting (Kitchener Stitch)
30. Left-handed Knitting
31. Knitting with Ruffles Yarn
32. Knitting on Circular Needles
33. Knitting I-Cord
34. Folded Picot Edge
35. Fair Isle Knitting
36. Backwards Loop Cast On

 Hope you have a relaxing and useful time on weekends
RPDT3MCZE3YE  

A Very Simple Beginning of Knitting and the Basic Stitches

Holding the needle 1
The right needle is held I the same position as holding a pencil. For casting on and working the first few rows the knitted piece passes over the hand, between the thumb and the index finger. Let the thumb slide directly under the knitted piece while you still grasp the needle from below. 


Holding the needle 2
The needle in your left hand is held lightly over the top, using the thumb and the index finger to control the tip of the needle.


Holding the Yarn Method 1
While you hold the yarn in your right hand, pass it under your little finger, then around same finger, over your third finger, under the centre finger and then over your index finger. Here use your index finger to pass the yarn around the tip of the needle. The yarn is circled around the little finger creates the necessary tension for knitting evenly.


Holding the Yarn Method2
Holding the yarn in the right hand, pass under the little finger, over the third finger, under centre finger and over index finger. The index finger is used to pass the yarn around the needle tip. Control the tension applied to the yarn by gripping the yarn in the crook of the little finger.


Steps in Knitting and The Basic Stitches

There are two best ways of casting on, each serving a rather different purpose. Thumb method is used whenever an extremely elastic edge is needed or when the rows have to be cast on the edge immediately so that they can be worked into a stocking stitch or garter stitch.
The second method is the cable or between the needles method. This gives a very neat as well as firm finish that is ideal for use before ribbing or any different firm stitch.
These methods commence with the slip knot and this is the starting-off Point for almost everything you do in knitting.
Click to see  fullsize
(Quotation from '440 more knitting stitches's book)

What is Entrelac knitting? How to Entrelac Knitting?

Entrelac knitting is a very interesting type of knitting. It is a knitting technique that create a diamond pattern.

Unlike many textured knitting techniques, entrelac knitting can be used for multicolored patterns. You can have many different colors for single pattern but it is preferred to restrict the usage of colors to two or three as with the increase in the number of colors complexity of this increases.

Entrelac can be knit flat or in the round for a cylinder. However, unlike typical round knitting, the knitting is turned after a full round of squares so the next set is knitted in the opposite direction.

Here’s the detail of how to entrelac knitting. I find it in a "Entrelac" book.


.

Learn to read a knitting chart video from YouTube

How to Read a Lace Knitting Chart, Part 1


How to Read a Lace Knitting Chart, Part 2


How to Read a Cable Knitting Chart


.


.

How to Read Knitting Charts

It is simpler than you think.

Knitting charts and written instructions are equally useful for gaining your mastery and having more pleasure from knitting. Very many knitting instruction provide both versions of the pattern - graphical charts and written descriptions.

Knitting Charts. How to read them.As usually, in arguing about "what is BETTER", truth is located somewhere in between. Your best tool is that one which you feel confidence and comfort working with. This page will show you how to read knitting charts presented in graphic symbols. Needles to say, it is not that difficult as it seams. Let's see how it works.
All designers describing their knit patterns in charts follow the same logic. This logic is based....right, on the common sense and a natural way of knitting.
Knitting synbols. What do they present?It makes our life much easier while we read knitting charts. Needless to say, that knitting symbols for charts are not standardized. Different sources of knitting patterns use different (slightly... :) symbols presenting their patterns. Fortunately, each chart has a stitch key, which explains what kind of stitches has to be used to knit a pattern.

Let's analyze the way we usually knit. In flat knitting the first stitch to knit is the very right one on the needle. Direction of knitting is from right to left. Once we reached the end of the row, we turn our knitting over and begin second row facing the back of the work.

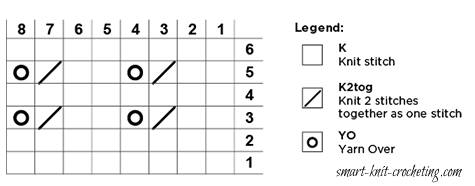
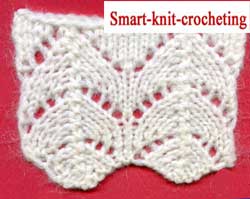
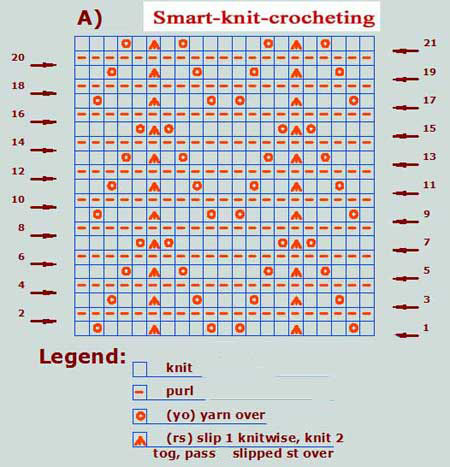
At the end of the second row we turn our knitting over once again and facing the face of the work, and so on. The boxes of the knitting charts "behave" just like the stitches do on the needles. Let's look at the chart A) where a classical pattern "Horseshoes" is presented.

Knitting Charts. How to read them?
  • Each box of the knitting chart represents a stitch. Horizontal rows of boxes are the rows of stitches.

  • A stitch key or a legend tells you what each graphical symbol/box in the chart means. As I already mentioned above, knitting symbols are not standardized. Nevertheless, a stitch key will always make knitting symbols clear for you. Here is a good set of knitting symbols with detail illustrations for each knitting stitch.

  • Right vertical column of the numbers shows odd rows of the Right Side (RS) of knitting. Facing the Right Side of your knitting, follow the chart reading it from right to left. Exactly the way you knit your stitches.

  • Left vertical column of the numbers shows even rows of the Wrong Side (WS) of knitting. Direction of knitting on the Wrong Side is the same : from right to left. Nevertheless, facing the Wrong Side follow the chart, reading the symbols from left to right.

Here is a written description for the same pattern. Compare it to the chart above. (For the list of knitting abbreviations consult the Craft Yarn Council).
  • Row 1: K1, *yo, k3, sk2p, k3, yo, k1*, from * to* repeat to end of row.

  • Row 2 and all even rows: Purl

  • Row 3: K1, *k1, yo, k2, sk2p, k2, yo, k2* from * to* repeat to end of row.

  • Row 5: K1, *k2, yo, k1, sk2p, k1, yo, k3* from * to* repeat to end of row.

  • Row 7: K1, *k3, yo, sk2p, yo, k4* from * to* repeat to end of row.

  • Row 8: Purl.


Knitting charts. Right Side Rows.
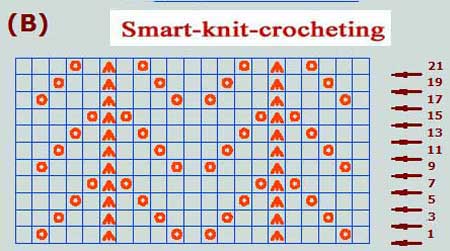
You can see that all even rows of this knitting pattern have to be purled. To make knitting charts more compact, very often charts are printed with Wrong Side rows left off the chart. (see chart B). In this case the pattern tell you what should be done on those "missing" rows. For our example, it would be written: "Purl all even rows." For other patterns it could be written: "Knit the knits and purl the purls", for example.

Reading Charts Summary and Additional Hints:

  1. Each symbol presents certain kind of stitch.

  2. For Right Side Rows, follow pattern reading chart from right to left.

  3. For Wrong Side Rows, follow pattern reading chart from left to right.

  4. For circular knitting every row should be read in the same direction.

  5. Be sure to read the chart before you start to knit. Very often Wrong Side Rows are not shown on the chart. Remember to work them!

  6. Watch for the pattern repeats. They usually are shown in a box and help you to follow the knitting chart.

  7. Don't be confused if in some knitting charts you will see a "No Stitch" box. They are there for a good reason to show you how the pattern lines up. How should you treat them? Just DON'T PAY ATTENTION following the pattern chart. DO NOTHING. "No Stitch" means none stitch should be knitted there.

Source: http://www.smart-knit-crocheting.com/knitting-charts.html
Click this topic to see more:  Learn to read a knitting chart video from YouTube

Knitting Abbreviations and Knitting chart Symbols

Before you start the first project is find a comfortable and quiet place to knit. We shouldn't be too worried. The beginning of learning how to knit is very difficult for those who have never held knitting needles but everything will be all right. It is important to remember not to hurry.

Here is knitting Abbreviations.
It has all of the standard abbreviations used in knitting patterns. I hope you're paying attention, because this is very important.

  1.     alt     alternate

  2.     approx     approximately

  3.     beg     begin[ning]

  4.     blocking     Information about blocking can be found here and here.

  5.     BO     bind off [cast off]

  6.     cab     cable

  7.     CC     contrasting color

  8.     cn     cable needle

  9.     CO     cast on

  10.     cont     continue[ing]

  11.     dec     decrease[ing]

  12.     dpn     double pointed needles[s]

  13.     foll     follow[s][ing]

  14.     g     grams

  15.     i-cord     When working I-cord, work is not turned. Instead of turning the work around to work back on the WS, slide all sts to the other end of the needle, switch the needle back to your left hand, bring the yarn around the back of the work, and start knitting the sts again. After the first 2 sts, give the yarn a sharp tug.

  16. Repeat this row to form I-cord. After a few rows, the work will begin to form a tube.

  17.     inc     increase[ing]

  18.     incl     including

  19.     inst     instructions

  20.     k     knit

  21.     k tbl     knit through back of loop

  22.     k2tog     knit two together

  23.     kfb     knit into front and back of stitch

  24.     m     meter[s]

  25.     MB     make bobble

  26.     MC     main color

  27.     m1     Make 1 stitch: Insert left needle, from front to back, under strand of yarn which runs between last stitch on left needle and first stitch on right needle; knit this stitch through back loop.

  28. 1 stitch increased.

  29.     mm     millimeters

  30.     mult     multiple

  31.     opp     opposite

  32.     oz     ounces

  33.     p     purl

  34.     p2tog     purl two together

  35.     patt[s]     pattern[s]

  36.     pfb     purl into front and back of stitch

  37.     pm     place marker

  38.     psso     pass slipped stitch[es] over

  39.     rem     remaining

  40.     rep     repeat

  41.     rev St st     reverse stockinette stitch

  42.     RS     right side[s]

  43.     rnd[s]     round[s]

  44.     sc     single crochet

  45.     SK2P     slip 1 stitch, knit two together, pass slipped stitch over

  46.     SSK     slip 2 stitches as if to knit, then knit those 2 stitches together

  47.     SSP     slip 2 stitches as if to purl, then purl those 2 stitches together

  48.     sl     slip

  49.     slp     slip one as if to purl

  50.     sl st     slip stitch

  51.     st[s]     stitch[es]

  52.     St st     stockinette stitch

  53.     tbl     through back of loop[s]

  54.     tog     together

  55.     WS     wrong side[s]

  56.     w&t     Wrap and turn. Bring yarn to front of work between needles, slip next st to right-hand needle, bring yarn around this st to back of work, slip st back to left-hand needle, turn work to begin working back in the other direction.

  57.     YO     yarn over

  58.     * *     repeat directions between ** as many times as indicated

Here is knitting chart symbols 


Knitting instructions For Beginners - Knitting Yarn


Knitting yarn may be made up from a combination of different fibres.
Yarn can of animal origin (wool, angora, mohair, silk, alpaca), vegetable origin (cotton, linen) or man-made (nylon, acrylic, arayon).


Yarn is the term used for strands of soun fibre which are twisted together into a continuous thread of the required thickness. Each single strand of yarn is known as a ply, A number of plys are twisted together to form the yarn. The texture and characteristics of the yarn may be varied by the combination of fibress and by the way in which the yarn is spun. Wool and other natural fibres are often combined with man-made fibres to make a yarn that is more economical and hard-wearing. Wool can also be treated to make it machine washable. The twist of the yarn can be varied too. A tightly twisted yarn is firm and smooth and knits up into a head-wearing fabric. Loosely twisted yarn has a softer finish when knitted
Animal knitting yarns: 

Wool comes from a domesticated sheep. Wool accepts dye well, is flame-retardant by nature, remains warm even when wet, sheds water better than other yarns. Natural wool should be hand-washed. 'Superwash' wool has been treated to allow machine washing. Wool will usually resume its proper shape when washed correctly; if it is mistreated and washed in too-hot water, it will shrink or felt.

Mohair comes from an Angora goat. Mohair is durable, sheds dirt, dyes well and does not felt easily. Despite its hardiness, it is usually spun into knitting yarn used for fluffy garments and scarves. This knitting yarn is abraded, roughing its fibers to create that 'fuzzy' look

Angora comes from rabbits. Fabric made from this yarn is inelastic, very fluffy, soft and warm.

Silk is the yarn produced by silk moths. Silk knitting yarn is made from damaged silk cocoons and broken fibers. 'Raw' silk still has the original moth secretions in it. 'Tussah,' silk obtained from wild moths is brown. The food fed to domesticated moths determines their silk's natural color; this can white, green or yellow. Silk retains heat, absorbs moisture, pills less than wool, is very strong and very stable when knit, neither shrinking or stretching.

Cashmere comes from the undercoat of a Cashmere goat. It is so expensive because only a few ounces are obtained from each goat per year. It is such a delicate yarn, more fragile than wool and more susceptible to abrasion, that it is usually blended with wool to make it more durable

Camel comes from the two-humped or Bactrian camel. Camel hair cannot be bleached, so it is either used undyed or dyed a darker color. It is lightweight and fragile

Vicuna comes from the vicuna, a South American relative of the camel. They are rounded up once a year and shorn like llamas or sheep; their hair is finer than any other animal yarn.

Alpaca is a smaller relative of the llama but its hair is more commercially valuable. Knitting yarn does not felt or pill easily. It comes in fifteen natural colors (as do the alpacas) and is denser than wool . The undercoat of a llama is very similar to alpaca hair

Qiviut (kiv-ee-uht) the yarn itself is very hard to find. It comes from a musk ox and resembles pale gray cashmere but does not shrink.


Vegetable knitting yarns: 

Cotton comes from surrounding the seeds in a cotton pod. Cotton is heavy, dense and inelastic; although it will regain its shape after washing, its ability to do so decreases over time. It is comfortable to wear in a cool climate but not a hot one (the opposite of wool) and is slow to dry once wetted. It makes a weaker knitting yarn than silk or linen but is stronger than wool.

Linen comes from the flax plant. It is durable and stronger than any other yarn. It absorbs moisture better than cotton and dries more quickly, making it more comfortable to wear than cotton in hot temperatures. It is easier to wash than wool and does not stretch or shrink.

Ramie is made from nettles It is often used as a substitute for linen since it is less expensive but shares linen's good qualities.

Rayon is a yarn produced from natural ingredients by artificial means.Rayon is a weak fiber but it is absorbent, dries quickly, and stretches (although it does recover some when dried in a automatic dryer.)

Synthetic knitting yarns: 

Nylon is lightweight, strong, elastic, resists abrasion, does not stretch or shrink (except at high temperatures,) and is easy to wash. It is usually combined with wool to impart its strength and elasticity to the wool.

Polyester is the most common type of synthetic yarn. Yarn made from it retains its shape. It adds strength and resilience to natural yarns. Polyester is very easy to wash and is more comfortable to wear than many other synthetics.

Acrylic is the most common synthetic in knitting yarns. They are resilient, moderately strong, somewhat inelastic, feel good to the hand and are light in weight. Acrylics are easily made to imitate natural yarns so they are sold as alternatives to wool. However, acrylics cannot wick away moisture from the body so their warmth diminishes when wet. The yarn  burns readily unless treated and will shrink in moist heat. Acrylics are often used to achieve novel textures and characteristics that are not available with natural yarns.

Metallic yarn (described above) is best used as a 'knit-along' with another, stronger yarn.

Fuzzy yarns obscure a stitch pattern but are warmer and cozier, although they wear less well and often shed like a St. Bernard in a Georgia summer.

Novelty yarns are ones with an unusual texture, color or appearance that comes through differences in its ply sizes, the combinations of its fibers or some variation in its spinning.
hand knitting yarn Slub knitting yarn has a textured, lumpy surface. It has a smooth ply and one that was spun unevenly, which creates 'slubs' or lumps in the ply.

Crepe knitting yarn has tiny bumps.

Boucle knitting yarn has its smooth ply so tightly twisted that it curls around the slub ply

Roving, mentioned above, is loosely spun wool. It is a weak knitting yarn and can pull apart while being knit. Once made up, the fabric itself holds the fibers together; although warm, the fabric will pill, abrade and does not wear well.

Eyelash or fur knitting yarn has long filaments grouped along its length. When the yarn is knitted, these filaments stick out from the fabric and give it a furry look.

Chenille is cut from a specially woven fabric. It twists while being knit because it has no oppositely-twisted plies to counteract the twist imparted by the knitting. It sheds from its cut edges.

hand knitting yarn Ribbon yarn is just that: thin ribbon used for knitting. Although most knitters let the yarn twist as it may, fine ribbon-knitting keeps each stitch as flat and smooth as possible.


See: Berroco Yarn, Lion Brand Yarn

Knitting instructions For Beginners - Knitting needles

I have a knitting instruction book. It is useful. Here are simple instructions helps beginner:

Knitting needles:

Knitting needles are used in pairs to produce a flat knitted fabric. They are pointed at one end to form the stitches and have a knob at the other end to retain the stitches. They may be made in plastic, wood, steel or alloy and range in size from 2mm to 17 mm in diameter. In the UK needles uses to be sized by numbers - the higher the number, the smaller the needle. Metric sizing has now been adopted almost everywhere. Needles are also made in different lengths. Choose a length that will comfortably hold the stitches required for each project.

It is usefull to have a range of sizes so that tension swatches can be knitted up and compared. Discard any needles that become bent. Points should be fairly sharp, blunt needles reduce the speed and ease of working.

Circular and double-pointed needles are used to produce a tubular fabric of flat rounds. Many traditional fisherman's sweaters are knitted in the round. Double-pointed needles are sold in sets of four or six. Circular needles consist of two needless joined by a flexible length of plastic. The plastic varies is length. Use the shorter lengths for knitting sleeves, neckband etc, and the longer lengths for larger pieces such as sweater and skirts.

Cable needles are short needless used to hold the stitches of a cable to back or front of the main body of the knitting.

Needle gauges are punched with holes corresponding to needle sizes and are marked with both the old numerical sizing and the metric sizing so you can easily check the size of any needle


Stitch holders resemble large safety pins and are used to hold stitches while they are not being worked, for example, around a neckline when the neckband stitches will be picked up and worked after back and front have been joined. As an alternative, thread it through the stitches to be held while they are still on the needble, then slip the stitches off the needle and knot both ends of the contrast yarn together.

Wool sewing needles are used to sew completed pieces of knitting together/ They are large with a broad eye for easy threading and a blunt-pointed that will slip between the knitted stitches without spliting and fraying the yarn. Do not use sharp pointed sewing needles to sew up knitting. A tapestry needle is also suitable.

A row counter is used to count the number of rows that have been knitted. It is a cylinder with a numbered dial that is pushed onto the needle and the dial is turned at the completion of each row.

A tape measure is essential for checking tension swatches and for measuring the length and width of completed knitting. For an accurate result, always smooth knitting out (without stretching) on a firum flat surface before measuring it.

A crochet hook is use full for picking up for dropped stitches
(Quotation from '440 more knitting stitches's book)
 Click here to see more.

How to Read a Knitting Pattern

Knitting patterns are, for the most part, pretty straightforward. This article is designed to break down and define each section of a knitting pattern so you’ll know what information to expect in what section. Not all patterns follow these guidelines, but most do.
Usually the page will start off with a title and photo of the finished product. These are standard and self explanatory. Now on to the juicy stuff:
Skill Level
Easy, Medium, Hard or Beginner, Intermediate, Advanced are examples of the information listed here. A quick glance here is how to tell if a pattern is within your skill level.
Here are a few examples of what kind of projects you might find in each skill level:
Easy/Beginner
You’ll probably find a lot of scarves here, as well as potholders, place mats, handbags, some afghans and even a few sweaters.
Medium/Intermediate
Stocking caps, cable knitted scarves and sweaters, afghans with alternating stitch patterns and most knitted tops fall under this skill level.
Hard/Advanced
Generally, if an item has a very intricate stitch pattern, it’s likely to be in the Hard category. Knitting pictures and designs would definitely be a more advanced undertaking, as would any type of knitting that requires a lot of shaping.
Sizes, Finished Measurements
Generally the main size is listed in normal font with all other sizes in parentheses. Example: S(M, L). When you read the knitting instructions further down in the pattern, the first set will apply to the main size, with adjusted instructions for other sizes in parentheses. Also in this section you should see total finished measurements for this project.
Materials
Any thorough pattern will list in detail what materials you’ll need to complete the project.
-Yarn: Since yarn weights vary by type, look for patterns listing yarn in length, that way you can substitute a yarn and still know how much to get.
-Needle Size: You should find information on the needles and needle sizes used to complete this pattern.
-Miscellaneous Supplies: If you need stitch markers, cable needles or any other miscellaneous supplies, the pattern should list these here as well.
Gauge
The gauge section should read something like this: 10 sts + 10 rows = 4″ in Stockinette.
Pattern
This is where the actual knitting begins. The pattern tells you what stitches to use in what sequence to create the project named at the top of the page. A complete pattern will also include a list of the abbreviations used, but in some cases, it’s assumed everyone knows what those abbreviations mean. Even advanced knitters have trouble with this sometimes.
Some Important Points to Remember
When following any pattern, it is imperative that you:
-Test your gauge before starting. There’s nothing worse than getting an hour into a project to find it’s 6 inches too narrow because your yarn is a smaller weight than the pattern calls for.
-Buy all the yarn for the project at the same time. Dyed yarns have “dye lots” and it’s important to get all of your yarn for one project from the same dye lot. If you don’t, you have a good chance of getting different shades of the same color throughout your knitting.
-Take a break if you’re frustrated, as you’re sure to be at some point. Knitting is a fun and relaxing hobby, don’t let it turn into a chore to get that afghan or poncho finished!