View more
Entrelac Knitting Patterns
Learn How To Knit Entrelac with Video at YouTuBe.Com
Knitting Yarn: Lion Brand yarns
Free Entrelac Beret knitting pattern at Lionbrand website
MATERIALS
620-118 Wool-Ease: Indigo : 1 ball
825-208 AmazingTM Yarn: Glacier Bay: 1ball
Lion Brand Double-Pointed Needles - Size 9
Lion Brand Split Ring Stitch Markers
Large-Eye Blunt Needles (Set of 6)
Additional Materials
Circular knitting needle size 9 (5.5 mm), 16 in. (40.5 cm) long
ABBREVIATIONS / REFERENCES
beg = begin(s)(ning)
k = knit
k2tog = knit 2 together
p = purl
p2tog = purl 2 together
rem = remain(s)(ing)
rep = repeat(s)(ing)
rnd(s) = round(s)
RS = right side
sl = slip
St st = Stockinette stitch
st(s) = stitch(es)
WS = wrong side
GAUGE:
18 sts = about 4 in. (10 cm) in St st (k on RS, p on WS). BE SURE TO CHECK YOUR GAUGE. When you match the gauge in a pattern, your project will be the size specified in the pattern and the materials specified in the pattern will be sufficient. If it takes you fewer stitches and rows to make a 4 in. [10 cm] square, try using a smaller size hook or needles; if more stitches and rows, try a larger size hook or needles.
STITCH EXPLANATION:
skp Slip 1 as if to knit, knit 1, pass slip stitch over knit stitch - 1 st decreased.
NOTES:
1. Entrelac knitting consists of rows of triangles and blocks that are worked in short rows. Short rows are rows that are worked over a portion of the sts in a row, leaving the remaining sts unworked. To work short rows, the pattern instructions will tell you to 'turn' before you reach the end of the row.
2. When knitting in the rnd on double pointed needles (dpns), your sts need to be divided fairly evenly onto the needles. If you are working with a set of 4 dpn, your sts should be divided among 3 needles. If you are working with a set of 5 dpn, your sts should be divided among 4 needles. The total number of sts will not always be evenly divisible by the number of dpns that you are using - this is not a problem! Simply divide your sts as evenly as possible, you will still create a symmetrical 'tube' of knitting.
3. Slip sts as if to purl.
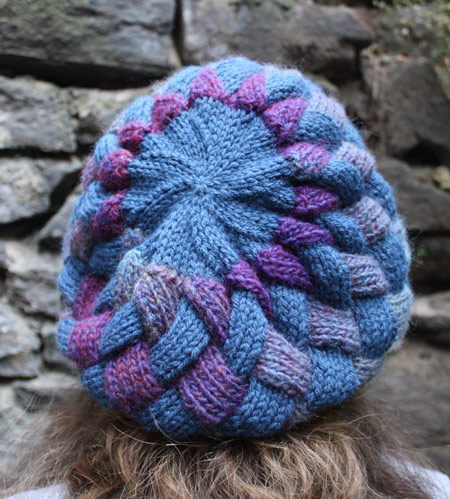
BERET
Ribbing
With circular needle and A, cast on 80 sts. Place marker for beg of rnd. Join by working the first st on left hand needle with the working yarn from the right hand needle and being careful not to twist sts.
Rnds 1-12: *K1, p1; rep from * to end of rnd.
Rnd 13 (turning ridge): Purl to end of rnd.
Rnds 14-25: *K1, p1; rep from * to end of rnd.
Fold ribbing, along the turning ridge, to the inside so that the cast-on edge is behind your needles and the turning ridge is at the bottom of the piece.
Joining Rnd: Insert left needle into first loop from cast-on edge; with right needle, knit the loop together with next st on left needle; *insert left needle into next loop from cast-on edge; with right needle, knit the loop together with next st on left needle; rep from * to end of rnd.
Entrelac Body
Change to B, leaving A attached.
Base Triangles
First Base Triangle
Row 1 (RS): K2, turn.
Row 2 (WS): P2, turn.
Row 3: Sl 1, k2, turn.
Row 4: P3, turn.
Row 5: Sl 1, k3, turn.
Row 6: P4, turn.
Row 7: Sl 1, k4, do not turn.
Next 15 Base Triangles Rep Rows 1-7 of First Base Triangle 15 more times.
Note: All ribbing sts should have been worked, and there should be sixteen 5-st triangles on the needle.
First Tier of Blocks
Change to A, leaving B attached.
First Block
Row 1 (RS): From RS, pick up and k5 sts across the slip stitch edge between the needles, turn.
Row 2 (WS): Sl 1, p3, p2tog, turn.
Row 3 (RS): K5, turn.
Rep Rows 2 and 3 three more times.
Row 10: Sl 1, p3, p2tog, DO NOT TURN.
Next 15 Blocks Row 1 (WS): From WS, pick up and p5 sts across the slip stitch edge between the needles, turn.
Row 2 (RS): K5, turn.
Row 3 (WS): Sl 1, p3, p2tog, turn.
Rep Rows 2 and 3 three more times.
Row 10: K5, turn.
Row 11: Sl 1, p3, p2tog, DO NOT TURN.
Rep Rows 1-11 fourteen more times.
Second Tier of Blocks
Change to B, leaving A attached.
First Block
Row 1 (WS): From WS, pick up and p5 sts across the slip stitch edge between the needles, turn.
Row 2 (RS): Sl 1, k3, skp, turn.
Row 3 (WS): P5, turn.
Rep Rows 2 and 3 three more times.
Row 10: Sl 1, k3, skp, DO NOT TURN.
Next 15 Blocks Row 1 (RS): From RS, pick up and k5 sts across the slip stitch edge between the needles, turn.
Row 2 (WS): P5, turn.
Row 3 (RS): Sl 1, k3, skp, turn.
Rep Rows 2 and 3 three more times.
Row 10: P5, turn.
Row 11: Sl 1, k3, skp, DO NOT TURN.
Rep Rows 1-11 fourteen more times.
Third Tier of Blocks
Rep First Tier of Blocks.
Fourth Tier of Blocks
Rep Second Tier of Blocks.
Fifth Tier of Blocks
Rep First Tier of Blocks.
Top Triangles
Change to B, leaving A attached.
First Top Triangle
Row 1 (RS): From RS with B, pick up and k6 sts across slip stitch edge between the needles, turn. Note: After First Top Triangle is completed, you will pick up only 5 sts across the slip stitch edge to begin each of the remaining top triangles.
Row 2 (WS): P6, turn.
Row 3: Skp, k3, k2tog, turn.
Row 4: P5, turn.
Row 5: Skp, k2, k2tog, turn.
Row 6: P4, turn.
Row 7: Skp, k1, k2tog, turn.
Row 8: P3, turn.
Row 9: Skp, k2tog, turn.
Row 10: P2tog, turn.
Row 11: Skp.
DO NOT TURN.
Next 15 Top Triangles Row 1 (RS): From RS with B, pick up and k5 sts across slip stitch edge between the needles, turn.
Row 2: P6, turn.
Rows 3-11: Rep Rows 3-11 of First Top Triangle.
Rep last 11 rows fourteen more times-1 st rem on needle.
Cut B. Top of Hat
Work top of Hat with A only.
Pick-Up Rnd (RS): With A, pick and k4 sts across edge of first triangle, pick up and k5 sts across edge of each of remaining triangles-80 sts at the end of this rnd. Place marker for beg of rnd.
Join by working the first st on left hand needle with the working yarn from the right hand needle and being careful not to twist sts.
Note: When sts have been sufficiently decreased, change to double pointed needles.
Decrease Rnd 1 (RS): *K2tog, k8; rep from * to end of rnd - 72 sts at the end of this rnd.
Decrease Rnd 2: *K2tog, k7; rep from * to end of rnd - 64 sts at the end of this rnd.
Decrease Rnd 3: *K2tog, k6; rep from * to end of rnd - 56 sts at the end of this rnd.
Decrease Rnd 4: *K2tog, k5; rep from * to end of rnd - 48 sts.
Decrease Rnd 5: *K2tog, k4; rep from * to end of rnd - 40 sts.
Decrease Rnd 6: *K2tog, k3; rep from * to end of rnd - 32 sts.
Decrease Rnd 7: *K2tog, k2; rep from * to end of rnd - 24 sts.
Decrease Rnd 8: *K2tog, k1; rep from * to end of rnd - 16 sts.
Decrease Rnd 9: *K2tog; rep from * to end of rnd - 8 sts at the end of this rnd.
Cut yarn, leaving a long tail. Thread tail through remaining sts and pull to gather. Knot securely. FINISHING
Weave in ends.
Showing posts with label Others. Show all posts
Blanket Knitting , quota from Baby knits book
One of my friends lent me a book about knitting for baby . It is Baby Knit by Lois Daykin author, and it really nice! I consider this a book with a wealth of illustrations and detailed instruction. I would love to but I am so busy with work these days I cannot knit it.
This blanket is one of the patterns that I like most. I hope one day I can knit it
The blanket is made in exactly the same design as the cushion but with more patches, and is edged, like the cushion, with a striped garter stitch border.
This patchwork nursery cushion and matching blanket alternative will light up any baby’s room with their storytale imagery - the man in the moon, 2 stars, and a heart. Knit with a mix of stockinette, garter and seed stitches. They make interesting projects to work.
Entrelac Afghan Knitting Pattern By Jonelle McAllister
View more: Entrelac Knitting Patterns
The afghan can be made longer (make the entrelac strips longer) or wider (add another panel). Remember to adjust the amount of yarn.
Entrelac Afghan is free pattern at knittingonthenet.
Materials:
Patons Decor
75% acrylic/25% wool
210 yards/100 grams
3 balls Deep County Blue #1623 (Color A)
7 balls Rich Country Blue #1622 (Color B)
3 balls Aubergine #1623 (Color C)
3 balls Rich Aubergine #1627 (Color D)
Size 6 US (4.25 mm) 30 inch circular needle or size needed to obtain gauge
Size H crochet hook
Gauge:
20 stitches and 28 rows = 4 inches (10 cm)
Approximate Size:
42" by 57"
ABBREVIATIONS
SSK: Slip 2 stitches onto right hand needle knit then together from the back.
K2tog: Knit Two Together
P2tog: Purl Two Together
Intstructions
Entrelac Panels
With Color A Cast On 32 stitches and work base triangles as follows:
*Knit 1, turn, Purl 1, turn
Knit 2, turn, Purl 2, turn
Knit 3, turn, Purl 3, turn
Continue in this manner until you reach Knit 8; do not turn.
Repeat from * three times more.
Entrelac Row 2 (end triangle with WS facing)
With Color B:
Purl 1, turn, increase in this stitch, turn
Purl 1, P2tog, turn, increase in first stitch, Knit 1, turn
Purl 2, P2tog, turn, Knit 1, increase in next stitch, Knit 1, turn
Purl 3, P2tog, turn, Knit 2, increase in next stitch, Knit 1, turn
Purl 4, P2tog, turn, Knit 3, increase in next stitch, Knit 1, turn
Continue in this manner until you reach Purl 7, P2tog; do not turn.
Full entrelac with WS facing
*With color C, pick up 8 stitches purlwise along the edge of the triangle/rectangle directly underneath and work as follows:
Row 1: Knit , turn
Row 2: Purl 7, P2tog, turn
Rep these 2 rows 8 times but do not turn after the last purl row.
Rep from * twice more.
End triangle with WS facing
Pick up 8 stitches purlwise, turn
Knit 8, turn
Purl 6, P2tog, turn, Knit 7, turn
Purl 5, P2tog, turn, Knit 6, turn
Purl 4, P2tog, turn, Knit 5, turn
Purl 3, P2tog, turn, Knit 4, turn
Continue decreasing in this manner until one st remains.
Fasten off.
Entrelac Row 3 (Full entrelac with RS facing):
Turn so you have the right side facing you.
With Color D, *pick up 8 stitches knitwise along the inside edge of the end triangle just worked.
Purl 8, turn, Knit 7, SSK, turn
Repeat 8 times but do not turn after last row.
Repeat from * 3 times more, picking up the stitches from the edges of the entrelacs as they present themselves.
Continue working, alternating colors A, B, C, and D.
Knit 43 complete entrelacs.
There will be a ½ square at the beginning.
Bind off on the 44th square.
Bind off as follows:
*Pick up 8 stitches along the edge of the edge triangle just worked on the previous row, turn
Purl 8, turn, Knit 7, SSK, turn
Purl 6, P2tog, turn, Knit 6, SSK, turn
Purl 5, P2tog, turn, Knit 5, SSK, turn
Purl 4, P2tog, turn, Knit 4, SSK, turn
Continue decreasing in this manner until one st remains.
Fasten off, but do not break yarn.
Repeat from * 3 more times, picking up stitches along edges of entrelacs as they present themselves.
Bind off.
For the center panel, use the color order D, C, B, and A. Make three panels in all.
Borders
The border is a pattern called Tanbark. To begin, take the center entrelac panel and pick up approximately 217 stitches with Color B. The right side of the entrelac should be facing you with the long edge facing you. The exact number is not critical, but it must be an odd number. The border pattern is very dense, so you need enough sts to make the panel long enough. It is helpful to place a marker every 20 stitches to keep track of the pattern.
Row 1 (WS): Purl 1, *Slip 1 wyif, Purl 1; rep from *
Row 2: Purl 1, *Knit 1, Purl 1; rep from *
Row 3: Slip1 wyif, * Purl 1, Slip 1 wyif; rep from *
Row 4: k1, *Purl 1, Knit 1; rep from *
Rep these 4 rows for 3 inches or 34 rows. Bind off. Work the pattern for three inches (34 rows) and Bind off.
Pick up 217 stitches on the other side of the center panel and knit in Tanbark as for the first panel. Knit a panel of Tanbark on the outside edges of the two remaining panels.
Block
Do not press. Wash gently and pin out without stretching the knitting. When dry the entrelacs should be somewhat three-dimensional. The entrelac will pull up with the border, which is dense.
Finishing
Seam center and side panels. Knit the top and bottom in the Tanbark pattern, picking up approximately 193 stitches at each end and working 3 inches (34 rows).
With Color B, single crochet around the outside edge of the afghan.
Change to Color C and triple crochet around the outside edge once.
Change to Color D and triple crochet around the outside edge once.
Change to Color A and double crochet around the outside edge once
Soucre: http://www.knittingonthenet.com/patterns/afentrelac.htm
The afghan can be made longer (make the entrelac strips longer) or wider (add another panel). Remember to adjust the amount of yarn.
Entrelac Afghan is free pattern at knittingonthenet.
Materials:
Patons Decor
75% acrylic/25% wool
210 yards/100 grams
3 balls Deep County Blue #1623 (Color A)
7 balls Rich Country Blue #1622 (Color B)
3 balls Aubergine #1623 (Color C)
3 balls Rich Aubergine #1627 (Color D)
Size 6 US (4.25 mm) 30 inch circular needle or size needed to obtain gauge
Size H crochet hook
Gauge:
20 stitches and 28 rows = 4 inches (10 cm)
Approximate Size:
42" by 57"
ABBREVIATIONS
SSK: Slip 2 stitches onto right hand needle knit then together from the back.
K2tog: Knit Two Together
P2tog: Purl Two Together
An instructional knitting video demonstrating a "slip slip knit" decrease
An instructional knitting video for a "knit two together" decrease
Learn how to do the purl 2 together (p2tog) decrease
Intstructions
Entrelac Panels
With Color A Cast On 32 stitches and work base triangles as follows:
*Knit 1, turn, Purl 1, turn
Knit 2, turn, Purl 2, turn
Knit 3, turn, Purl 3, turn
Continue in this manner until you reach Knit 8; do not turn.
Repeat from * three times more.
Entrelac Row 2 (end triangle with WS facing)
With Color B:
Purl 1, turn, increase in this stitch, turn
Purl 1, P2tog, turn, increase in first stitch, Knit 1, turn
Purl 2, P2tog, turn, Knit 1, increase in next stitch, Knit 1, turn
Purl 3, P2tog, turn, Knit 2, increase in next stitch, Knit 1, turn
Purl 4, P2tog, turn, Knit 3, increase in next stitch, Knit 1, turn
Continue in this manner until you reach Purl 7, P2tog; do not turn.
Full entrelac with WS facing
*With color C, pick up 8 stitches purlwise along the edge of the triangle/rectangle directly underneath and work as follows:
Row 1: Knit , turn
Row 2: Purl 7, P2tog, turn
Rep these 2 rows 8 times but do not turn after the last purl row.
Rep from * twice more.
End triangle with WS facing
Pick up 8 stitches purlwise, turn
Knit 8, turn
Purl 6, P2tog, turn, Knit 7, turn
Purl 5, P2tog, turn, Knit 6, turn
Purl 4, P2tog, turn, Knit 5, turn
Purl 3, P2tog, turn, Knit 4, turn
Continue decreasing in this manner until one st remains.
Fasten off.
Entrelac Row 3 (Full entrelac with RS facing):
Turn so you have the right side facing you.
With Color D, *pick up 8 stitches knitwise along the inside edge of the end triangle just worked.
Purl 8, turn, Knit 7, SSK, turn
Repeat 8 times but do not turn after last row.
Repeat from * 3 times more, picking up the stitches from the edges of the entrelacs as they present themselves.
Continue working, alternating colors A, B, C, and D.
Knit 43 complete entrelacs.
There will be a ½ square at the beginning.
Bind off on the 44th square.
Bind off as follows:
*Pick up 8 stitches along the edge of the edge triangle just worked on the previous row, turn
Purl 8, turn, Knit 7, SSK, turn
Purl 6, P2tog, turn, Knit 6, SSK, turn
Purl 5, P2tog, turn, Knit 5, SSK, turn
Purl 4, P2tog, turn, Knit 4, SSK, turn
Continue decreasing in this manner until one st remains.
Fasten off, but do not break yarn.
Repeat from * 3 more times, picking up stitches along edges of entrelacs as they present themselves.
Bind off.
For the center panel, use the color order D, C, B, and A. Make three panels in all.
Borders
The border is a pattern called Tanbark. To begin, take the center entrelac panel and pick up approximately 217 stitches with Color B. The right side of the entrelac should be facing you with the long edge facing you. The exact number is not critical, but it must be an odd number. The border pattern is very dense, so you need enough sts to make the panel long enough. It is helpful to place a marker every 20 stitches to keep track of the pattern.
Row 1 (WS): Purl 1, *Slip 1 wyif, Purl 1; rep from *
Row 2: Purl 1, *Knit 1, Purl 1; rep from *
Row 3: Slip1 wyif, * Purl 1, Slip 1 wyif; rep from *
Row 4: k1, *Purl 1, Knit 1; rep from *
Rep these 4 rows for 3 inches or 34 rows. Bind off. Work the pattern for three inches (34 rows) and Bind off.
Pick up 217 stitches on the other side of the center panel and knit in Tanbark as for the first panel. Knit a panel of Tanbark on the outside edges of the two remaining panels.
Block
Do not press. Wash gently and pin out without stretching the knitting. When dry the entrelacs should be somewhat three-dimensional. The entrelac will pull up with the border, which is dense.
Finishing
Seam center and side panels. Knit the top and bottom in the Tanbark pattern, picking up approximately 193 stitches at each end and working 3 inches (34 rows).
With Color B, single crochet around the outside edge of the afghan.
Change to Color C and triple crochet around the outside edge once.
Change to Color D and triple crochet around the outside edge once.
Change to Color A and double crochet around the outside edge once
Soucre: http://www.knittingonthenet.com/patterns/afentrelac.htm
A Cellular Blanket is a Best Gift.
This blanket knitting pattern is very easy to knit!
Please follow the steps in the guide!
Source:http://www.berroco.com/exclusives/vexillo/vexillo.html
FINISHED MEASUREMENTS
Approximately 30” wide x 36” long
MATERIALS
4 Balls BERROCO SOX (100 grs), #1411 Sprinkles
Straight knitting needles, size 3 (3.25 mm) OR SIZE TO OBTAIN GAUGE
GAUGE
28 sts = 4”; 56 rows = 4” in Garter St
TO SAVE TIME, TAKE TIME TO CHECK GAUGE
STRIP A (Make 2)
With straight needles, cast on 42 sts. Work even in Garter St for 24”. Bind off.
STRIP B (Make 3)
With straight needles, cast on 42 sts. Work even in Garter St for 12”. Bind off.
STRIP C (Make 2)
With straight needles, cast on 42 sts. Work even in Garter St for 18”. Bind off.
STRIP D (Make 2)
With straight needles, cast on 42 sts. Work even in Garter St for 30”. Bind off.
FINISHING
Sew strips together following diagram.
Knit Entrelac Blanket For Your Baby. This is a Perfect Option
Click to the link below to read basic guides about entrelac knitting pattern for beginners
What is Entrelac knitting? How to Entrelac Knitting?
Learn How To Knit Entrelac with Video at YouTuBe.Com
Here is free entrelac blanket pattern for little angels, designed by Melissa Matthay and named Birdwing Baby Blanket.
For more information and free download, see: http://naturallycaron.com/projects/birdwing/birdwing_1.html :x
YARN
Naturally Caron.com Spa
(75% Microdenier acrylic; 25% bamboo; 3 oz/85 g, 251 yds/230 m ball): 5 balls
Shown in: #0001 Rose Bisque
NEEDLES
One pair size US 8 (5mm), or size to obtain gauge
SIZE: One size
KNITTED MEASUREMENTS
Approximately 30"/76 cm x 36”/91.5 cm
GAUGE
In Stockinette stitch, 18 stitches and 24 rows = 4"/10 cm
Gauge is not critical for this project.
ABBREVIATIONS
SSK: Slip 2 stitches onto right hand needle knit then together from the back.
K2tog: Knit Two Together
P2tog: Purl Two Together
Yo: Yarn Over
STITCHES USED
Stockinette stitch (St st)
BOTTOM BASE OF BLANKET
Cast on 104 stitches.
Work the start up triangles across row as follows:
Make first base triangles
(RS): * Row 1: Knit 2. Turn.
Row 2, 4, 6, 8, 10, 16, 18, 20: Purl to end of triangle being worked. Turn.
Row 3: Knit 3. Turn.
Row 5: Knit 3, ssk. Turn.
Row 7: Knit 5. Turn.
Row 9: Knit 6. Turn.
Row 11: Knit 6. ssk. Turn.
Row 12: Knit 7. Turn.
Row 13: Knit 1, YO, k2tog, YO, k2tog, YO, k2tog, Knit 1. Turn.
Row: 14: Knit 8. Turn.
Row 15: Knit 9. Turn.
Row 17: Knit 10. Turn.
Row 19: Knit 10, ssk. Turn.
Row 21: Knit 12.*
One triangle is complete.
Next six triangles
Repeat from * to * 6 more times. Turn.
Last Triangle
Rows 1-14: Work Rows 1-14.
Row 15: Knit 6, k2tog.
Row 16: Purl 7. Turn.
Row 17: Knit 5, k2tog. Turn.
Row 18: Purl 6. Turn.
Row 19: Knit 4, k2tog. Turn.
Row 20: Purl 5. Turn.
Row 21: Knit 3, k2tog. Turn.
Row 22: Purl 4. Turn.
Row 23: Knit 2, k2tog. Turn.
Row 24: Slip 1, k2tog, psso – 1 st rem.
Turn and count the 1 st you have on your needle as first st on next PU row.
First Square: PU 11 sts along edge of triangle – 12 stitches. Turn.
Rows 1, 3, 5, 9, 11, 13, 15, 17, 19 and 21: Knit 12. Turn
Rows 2, 4, 10, 12, 18, 20 and 22: Purl 11, p2tog. .Turn
Rows 7 and 15: Knit 1,*YO, k2tog; repeat from *, end k1. Turn
Rows 6, 8, 14 and 16: Knit 11, p2tog. Turn.
Repeat to last PU 12 sts and dec 1 st at side edge every other row until 1 stitch rem. Turn.
Second Square: PU 11 stitches.
Rows 1, 3, 5, 7, 9, 15, 17, 19, 21: Purl 12. Turn
Rows: 2, 4, 6, 8, 10, 14, 16, 18, 22: Knit 11, ssk. Turn
Rows 11 and 13: Knit 12. Turn
Row 12: Knit 1,*YO, k2tog; repeat from *. Turn
Repeat to last PU 12 stitches and dec 1 stitch at side edge every other row until 1 stitch rem. Turn.
Repeat First Square and Second Square for pattern. Work in pattern until piece measures 36” from beginning.
Begin next square dec 1 st at side edges every other row to create a triangle work until all sts are bound off.
FINISHING
With crochet hook, work 1 rnd single crochet around edge of entire blanket.
Using yarn needle, weave in ends.
What is Entrelac knitting? How to Entrelac Knitting?
Learn How To Knit Entrelac with Video at YouTuBe.Com
Here is free entrelac blanket pattern for little angels, designed by Melissa Matthay and named Birdwing Baby Blanket.
For more information and free download, see: http://naturallycaron.com/projects/birdwing/birdwing_1.html :x
YARN
Naturally Caron.com Spa
(75% Microdenier acrylic; 25% bamboo; 3 oz/85 g, 251 yds/230 m ball): 5 balls
Shown in: #0001 Rose Bisque
NEEDLES
One pair size US 8 (5mm), or size to obtain gauge
SIZE: One size
KNITTED MEASUREMENTS
Approximately 30"/76 cm x 36”/91.5 cm
GAUGE
In Stockinette stitch, 18 stitches and 24 rows = 4"/10 cm
Gauge is not critical for this project.
ABBREVIATIONS
SSK: Slip 2 stitches onto right hand needle knit then together from the back.
K2tog: Knit Two Together
P2tog: Purl Two Together
Yo: Yarn Over
An instructional knitting video demonstrating a "slip slip knit" decrease
Instructional video for a yarn over increase
An instructional knitting video for a "knit two together" decrease
Learn how to do the purl 2 together (p2tog) decrease
STITCHES USED
Stockinette stitch (St st)
BOTTOM BASE OF BLANKET
Cast on 104 stitches.
Work the start up triangles across row as follows:
Make first base triangles
(RS): * Row 1: Knit 2. Turn.
Row 2, 4, 6, 8, 10, 16, 18, 20: Purl to end of triangle being worked. Turn.
Row 3: Knit 3. Turn.
Row 5: Knit 3, ssk. Turn.
Row 7: Knit 5. Turn.
Row 9: Knit 6. Turn.
Row 11: Knit 6. ssk. Turn.
Row 12: Knit 7. Turn.
Row 13: Knit 1, YO, k2tog, YO, k2tog, YO, k2tog, Knit 1. Turn.
Row: 14: Knit 8. Turn.
Row 15: Knit 9. Turn.
Row 17: Knit 10. Turn.
Row 19: Knit 10, ssk. Turn.
Row 21: Knit 12.*
One triangle is complete.
Next six triangles
Repeat from * to * 6 more times. Turn.
Last Triangle
Rows 1-14: Work Rows 1-14.
Row 15: Knit 6, k2tog.
Row 16: Purl 7. Turn.
Row 17: Knit 5, k2tog. Turn.
Row 18: Purl 6. Turn.
Row 19: Knit 4, k2tog. Turn.
Row 20: Purl 5. Turn.
Row 21: Knit 3, k2tog. Turn.
Row 22: Purl 4. Turn.
Row 23: Knit 2, k2tog. Turn.
Row 24: Slip 1, k2tog, psso – 1 st rem.
Turn and count the 1 st you have on your needle as first st on next PU row.
First Square: PU 11 sts along edge of triangle – 12 stitches. Turn.
Rows 1, 3, 5, 9, 11, 13, 15, 17, 19 and 21: Knit 12. Turn
Rows 2, 4, 10, 12, 18, 20 and 22: Purl 11, p2tog. .Turn
Rows 7 and 15: Knit 1,*YO, k2tog; repeat from *, end k1. Turn
Rows 6, 8, 14 and 16: Knit 11, p2tog. Turn.
Repeat to last PU 12 sts and dec 1 st at side edge every other row until 1 stitch rem. Turn.
Second Square: PU 11 stitches.
Rows 1, 3, 5, 7, 9, 15, 17, 19, 21: Purl 12. Turn
Rows: 2, 4, 6, 8, 10, 14, 16, 18, 22: Knit 11, ssk. Turn
Rows 11 and 13: Knit 12. Turn
Row 12: Knit 1,*YO, k2tog; repeat from *. Turn
Repeat to last PU 12 stitches and dec 1 stitch at side edge every other row until 1 stitch rem. Turn.
Repeat First Square and Second Square for pattern. Work in pattern until piece measures 36” from beginning.
Begin next square dec 1 st at side edges every other row to create a triangle work until all sts are bound off.
FINISHING
With crochet hook, work 1 rnd single crochet around edge of entire blanket.
Using yarn needle, weave in ends.
Unique Necktie Knitting Pattern
If you like, you can knit necktie for yourself or to make gift for everyone.
Here is Necktie Knitting Pattern by Lion Brand Yarn
GAUGE:
20 sts and 32 rows = 4" [10cm] in Seed St. BE SURE TO CHECK YOUR GAUGE. When you match the gauge in a pattern, your project will be the size specified in the pattern and the materials specified in the pattern will be sufficient. If it takes you fewer stitches and rows to make a 4 in. [10 cm] square, try using a smaller size hook or needles; if more stitches and rows, try a larger size hook or needles.
STITCH EXPLANATION:
PATTERN STITCH
Seed Stitch
Row 1 *K1, p1; repeat from * across row.
Row 2 P the k sts, k the p sts.
TIE
Cast on 14 sts.
Work in Seed St until piece measures 21" [53.5 cm] from beg.
Dec Row Keeping to Seed St pattern, dec 1 st each edge – 12 sts. Work 7 rows even.
Dec Row Dec 1 st each edge – 10 sts. Work 35 rows even.
Dec Row Dec 1 st each edge – 8 sts. Work 7 rows even.
Dec Row Dec 1 st each edge – 6 sts. Work even until piece measures 39" [91.5 cm] from beg.
Inc Row Keeping to Seed St pattern, inc 1 st each edge – 8 sts. Work 7 rows even.
Inc Row Inc 1 st each edge – 10 sts. Work even until piece measures 54" [137 cm] from beg. Bind off.
FINISHING
Weave in ends.
Wool Shoes For Beautiful Little Princess.
When I saw this wool shoes, I became very interested. That's the perfect combination of colours and graceful design that can look good with short skirt. I really admire delicacy of workmanship who designed it.
You can easily create a beautyfull shoes for you or family members. Simply follow these step by step instructions carefully. To see all her knitting patterns, you can type the keyword “Purl Bee Patterns” in Google search box.
Decrease Row: Slip 1, k2tog, k to last 3 stitches, ssk, knit 1 (20 stitches).
Knit 1 row.
Repeat the last 2 rows 8 more times (4 stitches).
Bind off.
Making the Upper
Starting at the center of the heel (with either side facing you), pick up 42 stitches to the center of the toe (pick up 1 stitch for every stitch around the heel and toe, and 3 stitches for every 4 up the sides).
Pick up 42 stitches down the other side to the center back of the heel and place a marker (pm). (84 stitches on needle). Work the following rows in the round.
Purl 1 round. (The first couple of rounds are a little tight and awkward, but it gets easier.)
Knit 1 round.
Purl 1 round.
Repeat the last 2 rounds.
Next round: Knit 32, pm (use a different color than the end-of-the-round marker), k2tog, k 16, ssk, pm (use the same color as the marker just placed), knit 32.
Purl 1 round.
Next round: Knit to marker, k2tog, knit to 2 stitches before marker, ssk, knit to end of round.
Repeat last 2 rounds until there are 6 stitches between the 2 same color markers (5 times) (70 stitches total remaining).
Bind off loosely.
Attaching the I-Cord
With the contrast yarn, use the provisional cast-on technique (see our provisional cast-on tutorial) to cast 4 stithces onto one US size 5 double pointed needle.
Starting at the center of the heel, knit an attached I-cord around the edge of the slipper. Pick up 1 st for every bound off stitch. For instructions on knitting an attached I-cord, see our tutorial. Finish the two live ends of the Attached I-cord by refering to our Kitchener Stitch Tutorial.
With a US size 5 double pointed needle, pick up 5 stitches inside the slipper, on the left side, right below the attached I-cord.

Slipping the first stitch of every row, knit in garter stitch until there are 16 1/2 ridges (ie for 33 rows) or until it is the length that fits your foot, bearing in mind that garter stitch really stretches.
The last row you knit should leave the yarn at the heel end of the slipper. Cut an 8 inch tail and thread it through a tapestry needle.
Straight across from where the strap began, thread the yarn up through a purl bump.
Then thread the yarn through the first stitch of the knitting needle as if to purl and remove the stitch from the needle.
Repeat these 2 steps until no stitches remain.
Weave in all the ends. And make another!

Gauge
5 stitches = 1 inch in garter stitch
Finished Size
5 stitches = 1 inch in garter stitch
Finished Size
Fits medium size woman's foot (shoe size 7-9)
Making the Sole
Note: If you slip the first stitch of every row, it will be a little bit easier to pick up stitches later.
Making the Sole
Note: If you slip the first stitch of every row, it will be a little bit easier to pick up stitches later.
Cast on 8 stitches
Row 1: Knit
Increase Row: Slip 1, kfb, knit to last 2 stitches, kfb, knit 1 (10 st).
Knit 2 rows.
Repeat the last 3 rows 2 more times (14 stitches)
Knit until piece measures 2 inches from cast on edge (or, if you prefer to count rows: Knit 11 rows).
Knit an Increase Row (16 stitches).
Knit until piece measures one more inch (11 rows).
Repeat the last 12 rows 3 more times (piece will measure 6-inches and there will be 22 stitches).
At this point the sole should look something like this:
Knit 3 rows.Row 1: Knit
Increase Row: Slip 1, kfb, knit to last 2 stitches, kfb, knit 1 (10 st).
Knit 2 rows.
Repeat the last 3 rows 2 more times (14 stitches)
Knit until piece measures 2 inches from cast on edge (or, if you prefer to count rows: Knit 11 rows).
Knit an Increase Row (16 stitches).
Knit until piece measures one more inch (11 rows).
Repeat the last 12 rows 3 more times (piece will measure 6-inches and there will be 22 stitches).
At this point the sole should look something like this:
Decrease Row: Slip 1, k2tog, k to last 3 stitches, ssk, knit 1 (20 stitches).
Knit 1 row.
Repeat the last 2 rows 8 more times (4 stitches).
Bind off.
Making the Upper
Starting at the center of the heel (with either side facing you), pick up 42 stitches to the center of the toe (pick up 1 stitch for every stitch around the heel and toe, and 3 stitches for every 4 up the sides).
Pick up 42 stitches down the other side to the center back of the heel and place a marker (pm). (84 stitches on needle). Work the following rows in the round.
Purl 1 round. (The first couple of rounds are a little tight and awkward, but it gets easier.)
Knit 1 round.
Purl 1 round.
Repeat the last 2 rounds.
Next round: Knit 32, pm (use a different color than the end-of-the-round marker), k2tog, k 16, ssk, pm (use the same color as the marker just placed), knit 32.
Purl 1 round.
Next round: Knit to marker, k2tog, knit to 2 stitches before marker, ssk, knit to end of round.
Repeat last 2 rounds until there are 6 stitches between the 2 same color markers (5 times) (70 stitches total remaining).
Bind off loosely.
Attaching the I-Cord
With the contrast yarn, use the provisional cast-on technique (see our provisional cast-on tutorial) to cast 4 stithces onto one US size 5 double pointed needle.
Starting at the center of the heel, knit an attached I-cord around the edge of the slipper. Pick up 1 st for every bound off stitch. For instructions on knitting an attached I-cord, see our tutorial. Finish the two live ends of the Attached I-cord by refering to our Kitchener Stitch Tutorial.
Knitting the Strap
Try the slipper on to see where you would like to have the strap. I placed mine 3 inches from the center of the heel.With a US size 5 double pointed needle, pick up 5 stitches inside the slipper, on the left side, right below the attached I-cord.


The last row you knit should leave the yarn at the heel end of the slipper. Cut an 8 inch tail and thread it through a tapestry needle.
Straight across from where the strap began, thread the yarn up through a purl bump.
Then thread the yarn through the first stitch of the knitting needle as if to purl and remove the stitch from the needle.
Repeat these 2 steps until no stitches remain.
Weave in all the ends. And make another!
Thank PurlBee.com very much for sharing this nice pattern with everyone!
Yo Yo Tote - Best Bag Pattern For Style Young
Just look at this bag! It's really beautiful, isn't it? I think it's a suitable bag for style young.
This is the best bag pattern I've find at berroco.com. To perform a bag knitting pattern, you have to follow the instruction to the letter.FINISHED MEASUREMENTS
Approximately 12½ wide x 8” high x 5” deep (Not including handles)
MATERIALS:
3 Hanks BERROCO WEEKEND (100 grs), #5946 Phlox
Straight knitting needles, size 7 (4.50 mm) OR SIZE TO OBTAIN
GAUGE
1 Set (4) double pointed knitting needles (dpn), size 6 (4.00 mm)
1 St marker
Tapestry needle
1 Pair 12” sewn round rein handles #RR12 from Homestead Heirlooms
One 8” dowel and finial set from Homestead Heirlooms
GAUGE18 sts = 4”; 26 rows = 4” in St st on larger needles
TO SAVE TIME, TAKE TIME TO CHECK GAUGE
NOTE
Lining and outer sections of bag are worked all in one piece, starting and ending at center bottom seam of lining.
OPEN CIRCLE
Row 1 (RS): K to marker, join another hank of yarn and bind off center 9 sts, k to end. Working both sides at once, bind off 3 sts at each circle edge 3 times. Work 3 rows even. Cast on 3 sts at each circle edge 3 times, end on RS.
Next Row (WS): Purl, cast on 9 sts over sts bound off on Row 1.
BAG
Front Lining: With straight needles, cast on 57 sts. Work even in St st for 2½”, end on WS. Purl 2 rows (Garter ridge). Cast on 11 sts at beg of the next 2 rows – 79 sts. Work even in St st for 2 rows.
* Dec Row (RS): K1, k2 tog, k to last 3 sts, SSK, k1 – 77 sts. Purl 1 row, knit 1 row, purl 1 row. Rep Dec Row once more. Purl 1 row. * Rep between *’s twice more, end on WS – 67 sts. Rep Dec Row every RS row 5 times more 57 sts. Work even until piece measures 9½” from beg, end on WS. Purl 2 rows (Garter Ridge – this is the top edge of bag and end of front lining).
Front: Work even until piece measures 10½” from beg, end on WS. Mark beg and end of last row. Work even until piece measures 11½” from beg, end on WS. Purl 2 rows (Garter Ridge). Work even in St st until piece measures 2” above markers, end on WS.
Note: Please read through this entire section before starting to knit.
Inc Row (RS): K1, M1k, k to last st, M1k, k1 – 59 sts. Rep this inc every RS row 4 times more, end on WS – 67 sts. ** Work dec row, purl 1 row. Work dec row, purl 1 row, knit 1 row, purl 1 row ** - 71 sts. Rep from ** twice more – 79 sts. AT THE SAME TIME, when piece measures 4” above markers, end on WS. Mark center 9 sts. Continuing to work incs as before, work Open Circle. When Open Circle and all incs have been completed, work even on 79 sts until piece measures 8” above markers, end on WS. Bind off 11 sts at beg of the next 2 rows – 57 sts. Work even until piece measures 2½” above bound-off sts, end on WS. Mark beg and end of last row – this is the center bottom of bag.
Back: Work same as front, working lining at end and omitting Open Circle. When lining measures 13½” above markers, end on WS – 57 sts.
Next Row (RS): K4, bind off 49 sts, k to end.
Following Row: P4, cast on 49 sts, p to end. Complete same as front and front lining. Bind off.
FINISHING
Yo Yo: With RS facing, using dpn’s, beg at lower edge of Open Circle, pick up and k96 sts around entire edge of Open Circle. Mark for beg of rnd and carry marker up. Purl 1 rnd.
Rnd 2: * Yo, p2 tog, rep from * around. Rep this rnd until yo yo measures 3” from beg.
Dec Rnd: * P2 tog, rep from * around – 48 sts. Bind off purlwise. Break off yarn leaving an 8” long end. Thread end into tapestry needle and thread end through every other st of bind-off. Pull up tightly and secure. Fold lining to inside along Garter Ridges at top edges of bag. Sew cast-on and bound-off edges of lining together. Sew side seams of lining. Sew side seams of bag, leaving 2” below top Garter Ridges open. Sew across back and front of bag working through double thickness of bag and lining along Garter Ridge 2” below top edge (this forms casing for dowels). Insert one dowel through each 2” opening and casing on back and front, gathering top of bag. Slide loops on handles over dowels, then glue finials in place at each end.
Feel The Sea Breeze With Bikini
Spring has gone. We were all so happy because summer has come, and pretty soon we'll have an interesting holiday. There's nothing better in life than sinking to seawater and letting the water take away troubles. Imagine when you lie on the sand enjoying good sunbathing, then sitting in the shade under a big sun umbrella, watching the sea water and listening to the waves with a cool drink in hand. That must be an amazing feeling.

Do you hear the roar of the waves on the rocks? If you've never listen to the waves, give it a try! To tell the truth, the sound of sea waves is like a love song.
There is nothing really more romantic than to have the one you love walking beside you on a moonlit beach and with a calm sea. I think that with just a thin scarf and this colorful pair of bikinis you'll feel more self-confident and much more charming!
If you're not too concerned with modesty, you can pick out a bikibi knitting pattern that looks charming to you!! You're sure to confident about your appearance on the beach!
Stretchy Cotton Bikini by Marcia Cleary
4 colors
Cute little stretchy bikini! Cascade is 98% cotton and 2% elastic. Choose a yarn with lycra elasticity. Knit with 1, 2, 3 or 4 colors.
Learn decorative chain edge. Pattern includes schematics.
Email mcleary@knittingbag.com for Free Pattern!
Learn decorative chain edge. Pattern includes schematics.
Email mcleary@knittingbag.com for Free Pattern!
Just Beachy Bikini Top By TinaWhitmore
Lanikai Bikini by Tina Whitmore
This pattern is available for $5.50 USD
Valentine's Day Gifts of Love

I know in some countries, women give chocolate to men on February 14, and men give non-chocolate candy to women on March 14 White Day. In contrast, Men give gifts to women in Valentine's Day, and women return them on White Day.
Valentine's day is so wonderful. It is traditionally a day on which lovers express their love for each other by presenting flowers, offering confectionery, and sending greeting cards with everyone. I feel that is my happiest time.
What gift do you give on valentine's day?
Now, create a sweet surprise for your Valentine with knitting patterns here!
Love Rocks Heart Neck Decor
Hearts Scarf Pattern
Peruvia Rose
Valentine Mug Cozy
Stem Rose by Theresa Bernard
Easy Knitting Patterns

Here is a collection of quick easy and cheap craft ideas for knitting. If you like any of these patterns then please click title for a link to a free knitting pattern. I hope that knitting pattern is suitable for your ability.
Let's start with the simplest knitting pattern:
Garter Stitch

Enchanted


ZigZag
Washcloths are fun to knit because they are quick projects that are incredibly useful. Made of cotton, they're machine washable and will last a really long time.
A gift of a bunch of handmade washcloths would make a good housewarming gift or thank you for someone who has let you stay in their home. They'll get a lot more use than another bottle of wine.
Knitting for beginners is so simple and easily understandable. Do you agree?
Subscribe to:
Posts (Atom)